Visual Studio Code, or VS Code, is a favourite of many developers. Its wide operability and flexibility with multiple programming languages make it a popular IDE worldwide. It is ranked the top IDE by a huge margin in the 2023 Stack Overflow survey.
10 Best Visual Studio Extensions
VS Code comes with several extensions and plugins that can help developers boost their productivity, optimize their code and improve the quality of their projects. But which ones are the best? Here are 10 VS Code extensions for beginners as well as expert-level coders to try at least once:
1) Stylelint
Stylelint is a straightforward, automatic linter add-on for Visual Studio Code that can identify and flag bugs, stylistic mistakes, and other questionable constructs. To avoid garbage in the code, it also compels the developers to adhere to a set of specified stylistic guidelines.
Here’s how you can install this extension:
- Click Ctrl+P in VS Code.
- then run the ext install stylelint.vscode-stylelint command
- You can also go to the VS Code Marketplace and search for the Stylelint extension.
- You can directly install the extension from there itself.
Key Features:
- Support for creating customized rules through plugins.
- It fixes code errors as soon as it finds any patterns.
- Over 180 pre-built rules for contemporary CSS features.

When you set up the Stylelint extension’s settings or create a configuration file, Stylelint will begin automatically validating CSS and PostCSS documents, those that have the language identities CSS and postcss, respectively.
2) Docker
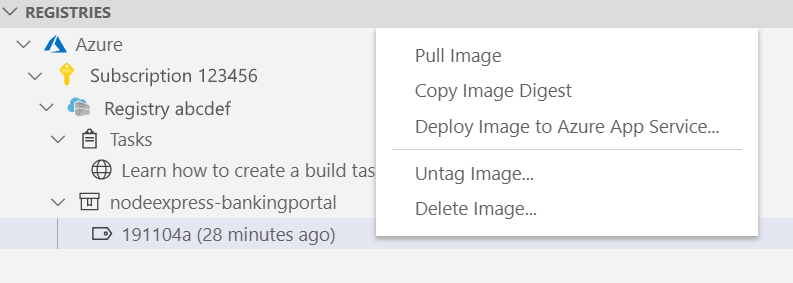
Building, managing, and deploying containerized apps from Visual Studio Code is made simple by the Docker extension in VS Code.
Additionally, it offers one-click containerized debugging for Python,.NET and Node.js. You can use Docker’s container management features in your preferred code editor by installing its plugin for Visual Studio Code. It can be used to construct, administer, and debug containerized apps with a few clicks and has received more than 17 million downloads.
Here’s how you can install this extension:
- Docker must first be installed on your PC.
- Next, in Visual Studio Code, hit Ctrl+P to run the ext install ms-azuretools.vscode-docker command.
- Alternatively, you may go to the VS Code Marketplace, look for the Docker extension, and install it straight into your local VS Code program.
Key Features:
- Docker commands built-in.
- Tips for editing the docker-compose.yml and dockerfile files.
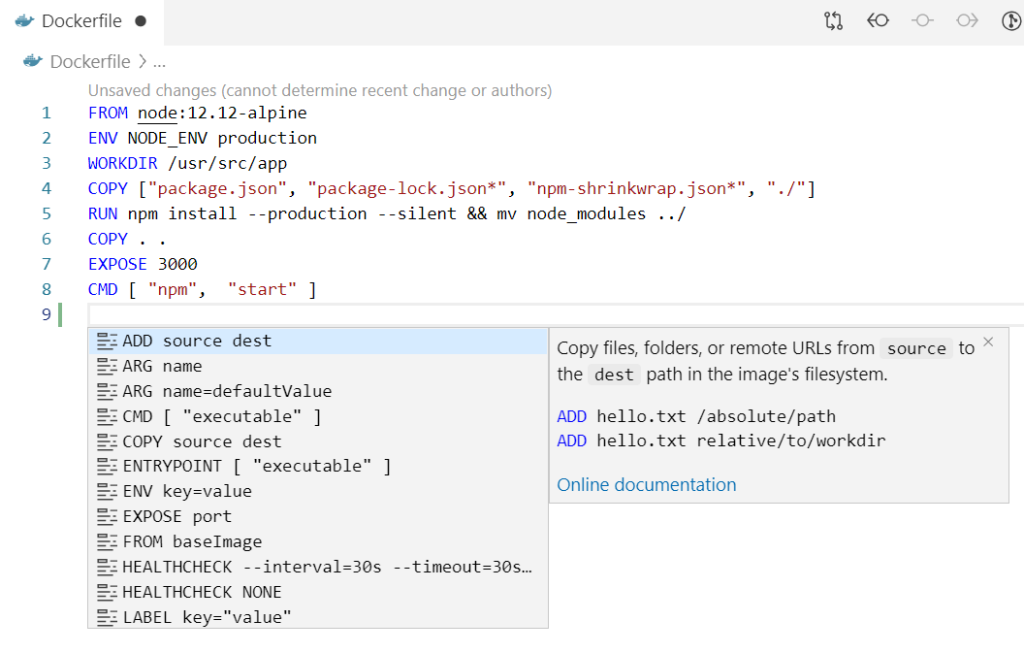
- Generating Docker files.
- Hovering over a Docker Compose YAML attribute displays tooltips.
- Python,.NET Core, and Node.js debugging support inside containers.
Services developed in Python,.NET (C#), or Node.js that are operating inside of containers can be debugged. The extension provides custom tasks to assist in attaching the debugger to an already-running service instance and initiating a service under the debugger.
Using Docker Images, you can launch the Linux-based standalone container for the Azure CLI (command-line interface): Use the Azure CLI command. You can now use the entire set of Azure CLI commands in a secure environment.
3) Prettier
Right now, one of the most widely used VS Code extensions is called Prettier. It facilitates developers adhering to a common style guide and upholding uniform styles throughout the development team. You can easily clean and format your code base to get rid of discrepancies by using Prettier.
To date, the VS Code Prettier addon has been downloaded by over 23 million developers.
Here’s how you can install this extension:
- In VS Code, press ctrl+p
- Execute the command ext install esbenp.prettier-vscode
- You can also visit the VS Code Marketplace and search for the Prettier extension.
- This will locally install the extension on your VS Code application.
Key Features:
- JSON, CSS, TypeScript, JavaScript, and more are supported.
- With keyboard shortcuts, format code.
- Your scripts will automatically format themselves so you can easily read them.
Using Command Palette (CMD/CTRL + Shift + P)
- CMD + Shift + P -> Format Document
OR
- Select the text you want to Prettify
CMD + Shift + P -> Format Selection
If you don’t like the keyboard defaults, you can rebind editor.action.formatDocument and editor.action.formatSelection in the keyboard shortcuts menu of vscode.
4) Live Server
By allowing developers to view the results of their code directly in the web browser without having to reload the page, the Live Server plugin enforces auto-reload and makes development easier.
Developers are relieved of the hassle of continuously saving work in the editor and refreshing the browser to view modifications. There have been over 2.4 million downloads of the Live Server extension.
Here’s how you can install this extension:
- In VS Code, press ctrl+p
- Execute the command ext install ritwickdey.liveserver
- You can also visit the VS Code Marketplace and search for the Live Server extension.
- This will locally install the extension on your VS Code application.
Key Features:
- Multi-browser support.
- Using the status bar to start and stop the server is simple.
- Adaptable port number, default browser, and server root.
- You can open HTML files and start the browser using the Explorer menu.
- Support for proxy and HTTPS.
How to use it?
- To turn the server on or off, open a project and select Go Live from the status bar.

- From the Explorer Window, right-click an HTML file, then select Open with Live Server.
- Open an HTML file, right-click on the editor, and select “Open with Live Server” to launch Live Server in another way.

- Press the keys (alt+L, alt+O) to start the server and (alt+L, alt+C) to shut it down.
- Press F1 or Ctrl+Shift+P to open the Command Pallete, then type Live Server: To launch a server, click Open With Live Server or enter Live Server: To end a server, use Stop Live Server.
5) Settings Sync
Developers can work on a project and sync file icons, key bindings, settings, snippets, and themes across several workstations by using the Settings Sync extension. For these services, it makes use of GitHub Gists. The documentation for GitHub includes further information about configuring it with Settings Sync. Over 3 million people have downloaded Settings Sync.
Here’s how you can install this extension:
- In VS Code, press ctrl+p
- Execute the command ext install Shan.code-settings-sync.
- You can also visit the VS Code Marketplace and search for the Settings Sync extension.
- This will locally install the extension on your VS Code application.
Key Features:
- Easy one-click downloading and uploading
- A GUI for adjusting settings.
- A concluding summary page with details about the setup and impacted extensions.
- Gists and a GitHub account token can be used.
How to use it?
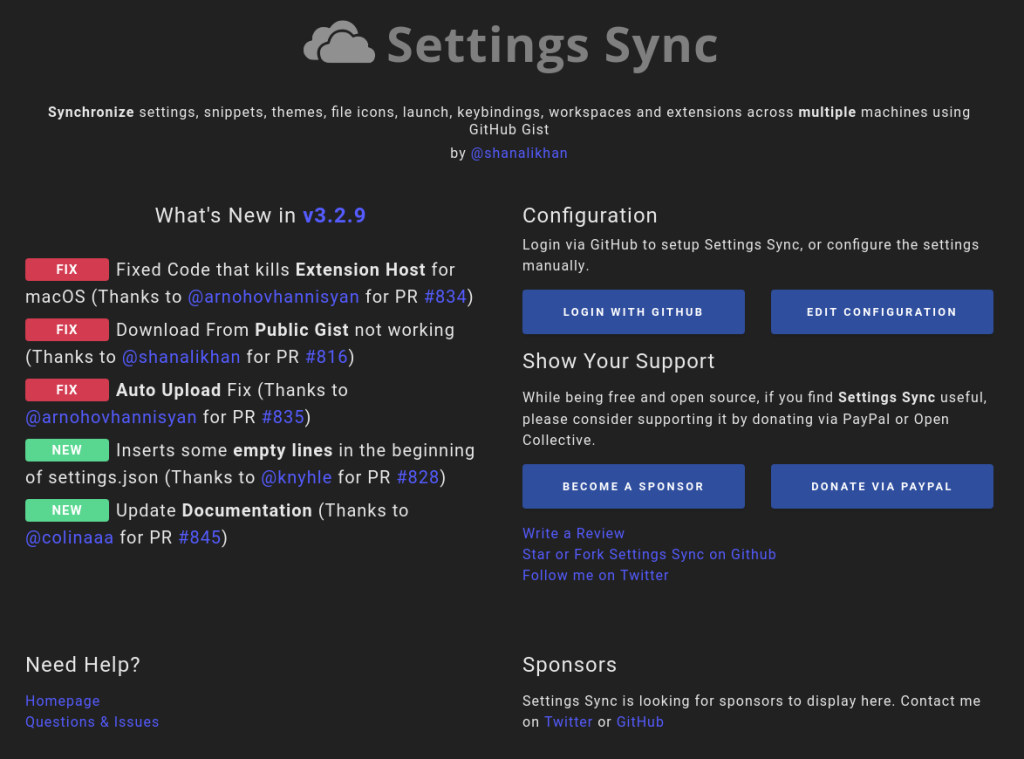
When the code starts, the Settings Sync Configuration page will open immediately and need two setups:
- GitHub Token
- GitHub Gist Id
If this is your first time using Settings Sync, your GitHub account must get your GitHub Token before creating a GIST.
- These are the actions that you must take in order to configure.
- Select “Log in with GitHub.”
- After logging into GitHub in your browser, shut the tab after you get the “Success” message.
- When you submit your settings using Settings Sync for the first time, a GIST will be generated automatically.
- A new window will popup if you already have GitHub Gist, allowing you to choose it or skip making a new one.
6) Import Cost
An estimated import package size is displayed in your code by Import Cost. It can be applied to stop importing large packages into your project, which will eventually lead to better application performance. As soon as you load the library into the VS Code editor, the package size is displayed.
Here’s how you can install this extension:
- In VS Code, press ctrl+p
- Execute the command ext install wix.vscode-import-cost
- You can also visit the VS Code Marketplace and search for the Import Cost extension.
- This will locally install the extension on your VS Code application.
Key Features:
- Both TypeScript and JavaScript are compatible.
- Support for a variety of import formats, such as whole content, default, selected, and more.
- It decides on the package sizes using Webpack.
How to use it?
Import-Cost monitors all modifications made to the text within the open editor window. It uses the Typescript and Babylon AST parsers to analyse the code of the current window whenever it detects a change (debounced, of course), and it then compiles a list of legitimate import or need candidates. A locally installed third-party library is a good candidate.
As an illustration, the code below will generate a list of three possibilities (react, react-dom, and lodash/uniqueId) and disregard the remaining ones.

The full import/require candidate’s line of code (more on this later) is then extracted by the extension and stored in a temporary file. The extension then launches the babili-webpack minifier plugin and webpack configured with the temporary file as the entrypoint. After that, Webpack will gather and bundle all of the library’s required dependencies.

The results are saved in a file-based cache after the bundling is finished. The library versions are taken into consideration while saving the package sizes to the cache. This is because, depending on the version of the imported library, the same piece of code may have a varied weight.

7) GitLens
GitLens is an amazing free and open-source VS Code addon that lets developers quickly see code authorship. GitLens makes it easy to switch between multiple code versions and quickly determine who, what, and when a change was made to a line of code. Over 16 million downloads have been made of it.
Here’s how you can install this extension:
- Visit VS Code Marketplace and search for the GitLens extension.
- This will locally install the extension on your VS Code application.
Key Features:
- Makes it simple to navigate through the revision history of a file.
- Provides a robust sidebar view that includes views for commits, repositories, branches, stashes, and more.
- Allows for integrations with Azure DevOps, Bitbucket, GoogleSource, GitHub, GitLab, Gitea, and Gerrit.
- At the conclusion of each line, the author and commits of the most recent modification are displayed.
How to use it?
Inline and Status Bar Blame provides historical context about line changes through unobtrusive blame annotation at the end of the current line and on the status bar.
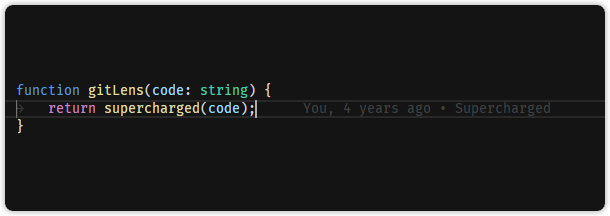
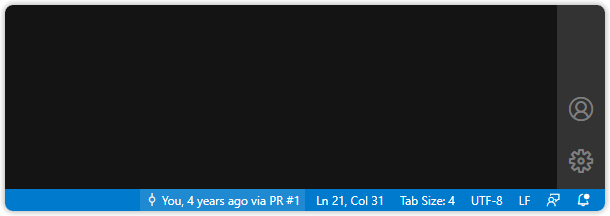
Use the Toggle Line Blame and Toggle Git CodeLens commands from the Command Palette to turn the annotations on and off.
Git CodeLens adds relevant and useful authorship information to the top of every file and the start of every code block.
- Recent Change: the file’s or code block’s author and the date of its most recent commit
- Authors: the total number of writers for the code block or file, as well as the most well-known writer if there are multiple writers.
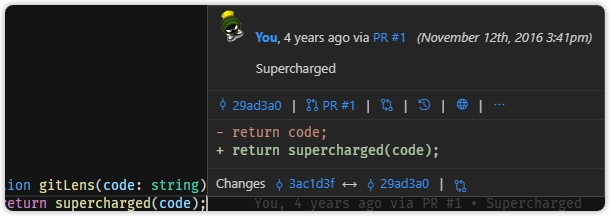
Rich Hovers hover over blame annotations to reveal rich details and actions.
8) Peacock
With several code editor windows open at once, the Peacock plugin comes in handy for altering the colour of your workplace. Differentiating between the several code editor windows and projects is useful. Over 1.7 million downloads of the Peacock extension have been made.
Here’s how you can install this extension:
- In VS Code, press ctrl+p
- execute the command ext install johnpapa.vscode-peacock
- You can also visit the VS Code Marketplace and search for the Peacock extension.
- This will locally install the extension on your VS Code application.
Key Features:
- Add different color customizations to various VS Code components.
- Make use of the editor’s contrast adjustments in various sections.
- Connect to VS Code Remote and Live Share.
- Create colors that you define.
how to use it?
Here’s how you can see Peacock in action:
- Open or Create a Workspace in VSCode
- To access the command panel, press F1.
- Type Peacock
- Choose Peacock: Change to a favorite color
- Select a pre-defined color and observe the resulting modifications to your editor.

9) Live Share
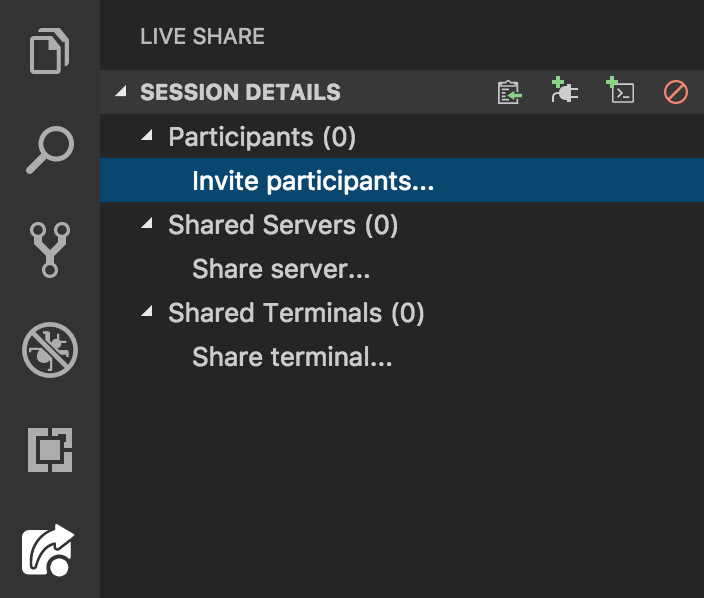
A VS Code addon called Live Share enables real-time developer collaboration. Users can work together on the server, debug sessions, and modify code by sharing a session with another user. Over 9.3 million downloads of the Live Share extension have been made.
Here’s how you can install this extension:
- In VS Code, press ctrl+p
- Execute the command ext install MS-vsliveshare.vsliveshare
- You can also visit the VS Code Marketplace and search for the Live Share extension.
- This will locally install the extension on your VS Code application.
Key features:
- Multiple developers can work on the same file at once by using the collaborative editing option.
- From the comfort of their chosen code editor, developers can rapidly share code samples with other members of their team.
- Options for access control to lock down files or folders.
- Joint troubleshooting.
How to use it?
After installing VS Live Share, it only takes a few steps to instantly share your currently open project:
- To share your project, click the Live Share icon in your status bar. A unique session URL will be copied to your clipboard.

- The first time you share, you’ll be prompted to sign in with a GitHub or Microsoft account so that people can recognize you while you’re working together.
- If you would like to work with other developers, provide them the session URL (which is copied to your clipboard) via email, Skype, Slack, or another platform. After receiving it, all they have to do to begin going is click the link.
- You will receive notification as soon as an invited “guest” joins, and their cursor will show up in the file that is now open. From the beginning, every guest will be “following” you, meaning they will follow your activities when you scroll or switch between files. This facilitates acquainting them with the problem, query, or assignment you’re going to begin working together on.
10) Polacode
Code snippets can be downloaded as.png and.jpg images using the Polacode extension. All of the current VS Code styles and code fonts are present in these screenshots. With over 794,000 downloads, Polacode is a useful tool for sharing and developing courses.
Here’s how you can install this extension:
- In VS Code, press ctrl+p
- Execute the command ext install pnp.polacode
- You can also visit the VS Code Marketplace and search for the Polacode extension.
- This will locally install the extension on your VS Code application.
Key features:
- Use a collection of instructions like polacode.shadow, polacode.target, and polacode.backgroundColor to change the appearance of an image.
- Use the dragging feature of the extension to resize the container or code snippet.
Usage:
Here’s a snippet demo of the Polacode extension:
Take a screenshot of VSCode using Polacode Extension #javascript #js #FullStack #devtips #100daysofcode #CodeNewbie #webdevtips #vscode pic.twitter.com/SULwu0Hscx
— Arbaoui Mehdi (@arbaoui_mehdi) February 29, 2020
Conclusion
These 10 VS Code extensions are chosen and picked based on various criteria to help developers boost their efficiency and optimality with their projects. They will not only improve your experience with VS Code but they will also help you get to know about various keyboard shortcuts and coding tricks that are embedded inside VS Code.


